Monday 3 December 2012

Friday 28 September 2012

Specs Appeal!

Hiya everyone!

 Like so many of you, my eyesight is fairly poor :(

I started wearing glasses around 12 years old, I thought even then that they were cool but as I got older I started wearing contact lenses alot more, even experimenting with different coloured ones:


coloured contact lenses


I used to wear dark brown and bright green! Lol, the camera doesn't do them justice!

But as I've got older, glasses have been becoming more and more of a fashion statement, so a few months back I treated myself to some designer ones!


The top ones are Versace and the bottom ones are Ray-bans - I love them both!
designer glasses

So after a few months of designer glasses bliss - my sister decided to get....Bella

designer glasses

As adorable as she was, the bigger shes getting the more of a menace she was becoming! Hence my disaster.......

Bad Bella! She chewed my Ray-Bans!

 So the other night I was looking at some new prescription designer frames online and who did I find was bringing out a range?


victoria beckham glasses range
Victoria Beckham!!!

Doesn't she look amazing???
I adore her style and I cannot wait to get my hands of some of her range, I think they all look amazing!
victoria beckham glasses range
The range is going to be six pairs of frames, (some of them unisex) made in Italy, with each one available in three different colourways.

Also the tips of each frame have been branded with a "V" so I guess people will know who your wearing!

Bad news is there not going to be available until early next year, and with a price range of around £260 ($410) a pair, I'll need to seriously start saving!

Anyone else love their glasses?  What do you think about Victoria Beckham releasing a range?

Lots of speccy love,
Gem 
xXx


Thursday 6 September 2012

DIY Designer Shoes!

Hiya!

Sorry its been a while, there's been lots going on! I'll be posting even more exciting things soon!

So the other day I was in my usual shopping street (e.g Heathrow Terminal 5 lol!) when I was walking by Kurt Geiger and saw their new shoe display


Ooooo so pretty!

I had a little wander in, and some of the shoes I saw I LOVED


I did not however, love the price, the blue stud flats above will set you back £95.00!!!

So I had a little think, and I thought it would be cool to try and jazz up some of my old shoes, inspired by these beautiful designs.

I went on ebay, and ordered some sheets of crystal rhinestones, you can get them in any colour and size, but I just stuck to clear for this little experiment

I also ordered some gold and silver spikes, which were so cheap, around £7.00 for 50 pieces you'll find loads of different sizes and styles on ebay

The first shoes I gave a makeover to were my £6 nude flats from Matalan, I got some extra hold super glue, cut off the bows, and applied the gold spikes in a kind of large triangle then added a few at the back of the shoe:


Pretty cool eh?

I also tried the rhinestones on an old pair of black heels:


These were easy to apply, you can cut them into strips, or individually apply to create different effects, different colours would look awesome
 
 For my black flat suede shoes, glue wasn't really an option, but the spikes come with screws, so I carefully got some sharp scissors, and made little holes in the shoe, put the screw in and screwed the spike on - easy!


What you guys think?
 There not quite designer standard yet, but I'm pretty pleased with my first attempts, I've kept the designs basic but I cant wait to try out some more fun and edgy looks!

If you can afford designer shoes then great, but for a fraction of the price, I don't think these look too bad!

Some tips for diy shoes:
  • Make sure you plan how many spikes, crystals etc your going to use, so you don't start, then run out!
  • Use a marker pen to mark out the points your going to be applying spikes etc so you get both shoes looking the same
  • Be extra careful with strong glue and scissors! Don't hurt yourself!
  • Please don't use expensive shoes if your just experimenting, practise on some old ones first before
Hope you guys try this out!

Gem

xXx

P.S I found two amazing websites: http://www.rossosolinishop.com/ which is designer soles for your shoes, there's loads of different styles and colours - amazing! They look so professional, and http://www.theheelcondoms.com/, which have amazing designs to dress up and protect the heels of your shoes, which are also amazing I'll defo be trying these out now I feel a bit braver!


Thursday 9 August 2012

imPRESS Press-On Manicure


Hiya!

I wanted to show some great nails: imPress Press-On Manicure by Broadway

What are they? Basically there false nails, but the difference is these babies require NO glue! NO drying time! Fast and Easy! Hoorah!

They come in a massive range of block colours and designs, there is something everyone will love

imPress press-on manicure in Ecstatic Cling

To show you guys, I bought the beautiful shade Ecstatic Cling which is a neon pink


imPress press-on manicure in Ecstatic Cling


imPress press-on manicure in Ecstatic Cling
The packaging is great, its like a little nail polish bottle and it's perfect for travelling about with
The packet has 24 covers with 12 nail sizes

First thing to do before you apply is to lay all the sizes out to find your correct fit

The nails have a little clear tab which you align with your cuticle to see what nail best fits, check both sides and when your happy, lay all ten out in finger order, always apply your thumbs last

To apply its so simple, make sure you have no polish left on your nails,and in the box you'll find a little prep pad, which you wipe over your nails to ensure there is no residue or moisture on your nails so the manicure will last longer

Starting with your little finger, peel off the clear film and press onto the nail firmly down the centre, then smooth it

imPress press-on manicure in Ecstatic Cling

And that's it!

Don't get your hands wet for 30 minutes after application as this could effect it bonding with your natural nail

imPress press-on manicure in Ecstatic Cling

imPress press-on manicure in Ecstatic Cling


The nails are designed to last for about one week, which mine did indeed do

They didn't even feel like they were loose or were going to ping off, the length is great, not too long, I was still able to type on my laptop and do buttons! Haha 

To remove, all you do is apply some nail varnish remover to the nail for 30 seconds, and gently peel off, I found it pretty easy and my nails don't appear to be damaged

imPress press-on manicure in Ecstatic Cling


Final thoughts on imPRESS manicure:

Pros:
  • Great packaging
  • Quick and easy with no glue
  • Easy to travel with, easy to apply, you could do them on a bus train, anywhere!
  • They're so shiny and glossy, like a professional manicure, I had so many compliments
  • 36 different shades so plenty of choice
  • They kept their promise they would last 7 days

Cons:
  • The size range of nails wasn't great, if you have wide nails you might struggle to get a good fit
  • My hair kept catching alot on the nails
The nails sell for £7.99 from Boots, which is I think is quite reasonable for a pack of 24, I think Superdrug now sell them for £5.99!


Hope you guys enjoyed that, let me know if you buy them!

Gem x

imPress press-on manicure in Ecstatic Cling

Thursday 2 August 2012

Face Contouring


Hiya!

Today I wanted to show a little bit of face contouring. I'm going to be using alot of product to show the full effects on camera, it looks great for a night out face, but for daytime just tone it down and use less!

Most people know what face contouring is, for those who don't, its a way of using makeup to slim, define or accentuate areas of the face, and highlight other areas to give your face more dimension

To put it simply, think of the areas of your face that light will naturally hit, those should be highlighted, areas that light wouldn't naturally shine on, should be contoured.

face contouring

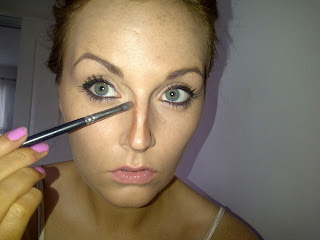
Here's a very attractive picture of me trying to show you the basics, I look so serious! Haha x


So, I'll show you guys a little contouring using a nice and cheap kit, then mabye later we'll advance it and get more professional and complex! Exciting!


face contouring
face contouring
I'm using good old Sleek Makeup with their face contour kit, costing £6.49 its pretty cheap, lasts ages, and it comes in Light, Medium and Dark so theres one for most skin types.

If you wanna use things you already have lying about,  highlighters examples are Mac in Shell or Benefit HighBeam - anything like that

For the contouring, you need a powder a few shades darker than your skin, making sure it is a matte (no shine) - Benefit Hoola Powder works great!

For actual brushes, I'm keeping this really simple, using a basic blusher brush, eyeshadow blending brush and shader brushes, as I always say, whatever works for you!

So, let's begin!

To start off, apply your usual foundation, concealer, whatever you do to create your "base"
face contouring
 I'm starting off with my nose, using a shader brush, I applied lightly down both sides of my nose, and the tip slightly

face contouring
When your blending it in, always blend in the same direction you applied it, so it doesn't spread the colour everywhere you dont want it to be!

face contouring
For the cheeks, your wanting to contour below the hollow of your cheekbone, if it helps, hold a brush to your face, lining it up with the top of your ear to your lips, then apply underneath, this also helps you get it even on both sides of your face

face contouring


Follow up to your temples, and slightly along your forehead

face contouring
Don't forget a little bit on your jawline, and remember your neck too!  Sometimes its nice to apply to your collarbones too, just to make them stand out a little more

face contouring
I cant say this enough - BLEND BLEND BLEND! I used an old foundation brush to really buff into my skin, you don't want ANY harsh lines on your face

face contouring
I just used my fingers to apply the powder highlighter.....
face contouring
And if your using a liquid highlighter, just dab slightly with your middle finger, have a peak at the picture at the top for basic highlight areas.

Obviously, you'll know your own face, some people have lovely dewy skin and wont require much highlight, others might want a more dramatic look for a photo shoot or nighttime look, I've used alot to show up better in pictures for you guys, time for some befores and afters!

face contouring
face contouring
face contouring
This was taken in natural light....
face contouring


See how slimmer the nose looks, and the cheekbones look more prominent

Remember to think about your lighting when your contouring, in a dimly lit room you could go overboard!

face contouring
Sorry Nicki if thats the look you wanted, but not my idea of contouring!


What do you think?  Dramatic yes, but you could also do it really subtle, just a touch would look fab!
The sleek kit isn't bad, a little hard to blend, but for the price, you cant complain!  Practise makes perfect with contouring, keep experimenting - I'm still learning, but that's my attempts so far!

Let me know if you try it out!

Gem x

face contouring